All posts by Neeraj Mishra

cinnamon powder

Is Cinnamon Powder Good to Prevent Fungus in Soil?

Is Cinnamon Powder Good to Prevent Fungus in Soil?


Are you tired of dealing with annoying fungus in your garden soil? Well, you can solve that problem with cinnamon powder! This common ingredient in your kitchen not only makes your food taste great but also helps fight off fungus in your garden.

Is Cinnamon Powder Good to Prevent Fungus in Soil

In this guide, we will talk about how cinnamon powder can keep your plants healthy and make your garden flourish.

Is Cinnamon Powder Good to Prevent Fungus in Soil?


Without a doubt, cinnamon powder is an excellent natural remedy for preventing fungus in soil. Its antifungal properties, coupled with its safety and affordability, make it a valuable asset for gardeners seeking to protect their plants’ health and vitality.

Understanding Cinnamon’s Antifungal Properties


Cinnamon powder boasts potent antifungal properties, making it a formidable opponent against soil-borne pathogens.

  • Its active compounds, such as cinnamaldehyde, work synergistically to inhibit fungal growth and protect plant roots from infections.

How Cinnamon Powder Acts as a Soil Sterilizer


One of the key benefits of cinnamon powder is its ability to sterilize soil, eliminating harmful fungi and bacteria without harming beneficial microorganisms. By creating a hostile environment for fungal pathogens, cinnamon powder promotes a healthy soil ecosystem conducive to plant growth.

How to use Cinnamon Powder as a Fungicide?

Sprinkle Cinnamon powder on the soil surface (1)

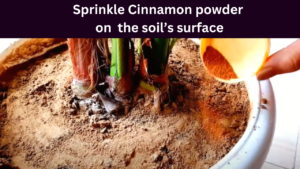
If the soil is well-drained, the risk of fungal attack is lower. To use cinnamon powder as a fungicide:

 If fungus is present on the surface, carefully remove that layer of soil.

  • Once the affected soil is cleared, evenly sprinkle cinnamon powder on the surface.
  • You will notice the fungus disappearing. This is a simple and effective remedy for the issue.

Note:

  • This treatment is typically effective as a one-time solution; there’s usually no need to repeat it. While there are many fungicides available in the market, such as Trichoderma spp, cinnamon powder can often yield better results.

READ, HERE: Benefits of Banana Peel Fertilizer

Benefits of Using Cinnamon Powder


Explore the numerous benefits of incorporating cinnamon powder into your gardening routine:

1. Safe and Natural

Unlike chemical fungicides, cinnamon powder is non-toxic and environmentally friendly, making it safe for use around children, pets, and beneficial insects.

2. Cost-Effective Solution

Say goodbye to expensive fungicides! Cinnamon powder offers an affordable alternative for controlling soil fungus, saving you money without compromising effectiveness.

Precautions and Considerations

While cinnamon powder is generally safe for use in the garden, it’s essential to exercise caution and follow these guidelines:

Avoid Overuse

While cinnamon powder is effective against soil fungus, excessive application may disrupt the natural balance of soil microorganisms. Use sparingly and monitor your plants’ response to avoid unintended consequences.

Quality Matters

Opt for high-quality cinnamon powder free from additives or synthetic ingredients. Look for organic options to ensure purity and efficacy.

At last,

In conclusion, cinnamon powder emerges as a versatile and effective solution for preventing soil fungus and promoting healthy plant growth. Its natural antifungal properties, coupled with its safety and affordability, make it a valuable addition to any gardener’s toolkit. By harnessing the power of cinnamon powder, you can enjoy lush, thriving gardens free from the grip of fungal pathogens.

Follow our Social media channel:

1. Voice of Plant – YouTube Channel

2. Voice of Plant Facebook Page

3. Instagram Voice of Plant Channel

Happy Gardening!

Gardener’s Guide: What is Potting Mix and How is it different from Garden Soil?

Understanding Potting Mix: A Gardener’s Guide


In gardening, deciding between potting mix and garden soil can determine whether your plants grow well or not. Let’s explore what potting mix is and how it’s different from garden soil.

“Healthy soil is the foundation of healthy plants and a healthy environment.”

Potting Mix

Potting Mix vs. Garden Soil: Unveiling the Differences


1. The Composition


soil mixture
potting mix

Potting mix, often referred to as potting soil (soil mix), is a specialized mixture prepared for container gardening. It is prepared by gardening experts to provide an ideal environment for potted plants. Unlike garden soil, which is found naturally in your outdoor space, potting mix is a man-made soil-mixture customize to the specific needs of potted plants. 

2. Key ingredients


Potting mix typically comprises a combination of organic and inorganic materials. These ingredients may include:

  • compost – (cow dung compost, vermicompost, leaf compost)
  • sand
  • coco peat
  • neem cake powder
  • bone meal
  • vermiculite
  • perlite
  • fungicide

3. Drainage and Aeration


potting mix provides good drainage system

A big difference between potting mix and garden soil is how well they let water and air move around.

  • Potting mix is made to let water drain well and give plant roots plenty of air. This helps roots grow strong and avoids them sitting in water.
  • Garden soil might not let water drain as well, so it is not the best choice for potted plants.

4. Nutrient levels


garden soil
plant growing in garden soil

“Garden soil typically has plenty of nutrients due to natural processes over time.”

  • On the other hand, potting mix is purposefully designed to provide a steady release of necessary nutrients over time to ensure that your potted plants get the nutrition they require.

5. Pest and disease resistance


Potting mix is good because it is less likely to have pests and plant diseases compared to garden soil. Garden soil can sometimes have harmful things that can harm your plants, but potting mix is treated to lower the chances of that happening.

Making the right choice for your garden


Now that you understand the fundamental differences between potting mix and garden soil, it is time to make an informed decision for your gardening endeavors. Here are some quick tips:

Consider mixing both


Garden area soil
garden soil

Mixing both potting mix and garden soil can be beneficial in certain situations. This combination offers the advantages of both, providing your plants with necessary nutrients and good drainage. It is a balanced approach to support healthy plant growth.

1. Use potting mix for container gardening


If you are planning to grow plants in pots, containers, or indoor settings, opt for potting mix. It is superior drainage, aeration, and reduced risk of pests make it the perfect choice for container gardening.

Container gardening
container gardening

2. Stick to garden soil for outdoor gardening

outdoor gardening
outdoor gardening

For outdoor garden beds or in-ground planting, garden soil is the natural choice. It is rich in nutrients and provides a suitable environment for your garden plants to thrive.

Conclusion


In conclusion, knowing how potting mix and garden soil are different is really important for your gardening success. So, choose the one that fits your needs best, and you will be on your way to growing a healthy and thriving garden.

Read here:

How to make best soil-mixture for plants

Follow our Social media channel:

1. Voice of Plant – YouTube Channel

2. Voice of Plant Facebook Page

3. Instagram Voice of Plant Channel

Happy Gardening!

How to grow mint from seeds

How to Grow Mint from Seeds at Home

How to Grow Mint from Seeds at Home


 Mint leaves not only add delightful flavor to dishes but also offer numerous health benefits. Due to its non-seasonal nature, having a mint plant at home allows for year-round availability. The aromatic qualities of mint serve as an excellent mouth freshener, provide relief to the stomach, and contribute to mental relaxation. Additionally, mint acts as a natural pest repellent in the garden. Its versatility extends to the kitchen, where it can be used to create a variety of tasty dishes and drinks.

Mint

With countless uses and benefits from a single plant, mint is a must-have in any garden. Let’s explore how to obtain, grow, nourish, and cultivate this versatile herb at home. 

How to get a Mint plant?


Mint plant in pot

1. From Nursery:

    • Mint plants are readily available at nurseries from April to October.
    • The cost is reasonable, ranging from Rs 30-40.
    • This is the easiest method for obtaining a mint plant.

2. Grow from cuttings:

    • Purchase mint from the market and use its stems.
    • Plant the stems in the soil using the correct method.
    • This is an effective way to propagate mint.

3. Grow from seeds:

    • While growing mint from seeds is a lengthy and challenging process, the resulting plant lasts for an extended period, typically around 3-4 years.
    • This method offers a more sustainable and long-term solution.

Plants cultivated through the first two methods have a limited lifespan and do not endure for an extended period.


How to Grow Mint from Seeds at Home


Growing Mint From Seeds: Optimal Conditions and Timing

Now, let’s delve into the details about the optimal conditions and timing for growing mint from seeds.

1. When to Grow?

The ideal period for sowing mint seeds is either in February-March or during the rainy season.

2.Perfect Temperature:

Mint grows well between 15-20℃.

  • Fluctuations in temperature can cause stress and deviation in the plant.
  • During periods of stress, the plant’s leaves may fade, but with a change in weather, it will recover and regain its health.

3. Quality of Seeds:

Always choose premium and fresh seeds when growing new mint plants.

  • Avoid using expired or old seeds, as they may not germinate properly if of poor quality. Buy premium quality seeds and refrain from purchasing old dated seed packets.

4. Germination Rate:

The germination rate is relatively sluggish.

  • Initially, only 3-4 seeds may germinate in 10-12 days, and the rest may follow after a month.

5. Use Pots for Germination:

Avoid using a seedling tray for germination.

  • Instead, directly sow the seeds in the pot where the plant will ultimately grow.

6. Perfect Pot:

rectangular pot for mint

Mint plants have spreading runner roots that grow rapidly and easily cover the ground.

  • Therefore, it is recommended to avoid planting them directly in the ground at home.
  • Choose broad-shaped or rectangular pots with a depth of at least 1 foot and as wide as possible.

Note:

  • Mint can hinder the growth of other plants if grown together or in the same pot.
  • It is advisable to cultivate mint in separate pots.

Soil Mixture for Mint plant

Soil mixture

1. Take local soil, clean it thoroughly using a sieve.

2. Use vermicompost in an amount equal to half of the soil quantity (Vermicompost can be replaced with any other compost).

3. Add river or construction sand in a slightly smaller quantity than the vermicompost to improve soil friability and drainage.

4. Take coco peat in a quantity equal to half of the sand quantity.

5.  Add a handful of neem cake powder and mustard cake powder.

6. Incorporate a small amount of fungicide to mitigate the risk of fungal growth.

Thoroughly blend all the ingredients, and the mint plant’s soil is ready for cultivation.

Mint seed sowing process in pot

1. Take a small pot, cover the bottom hole with newspaper, and  

Pot for Mint seeds germination

fill it with soil, pressing it in between and

Soil in pot

water the soil thoroughly to ensure it becomes moist.

water the soil thoroughly to

2. Add a layer of moist cocopeat on top, as mint seeds germinate well in cocopeat.

Add a layer of moist cocopeat

3. Position the seeds in the pot, covering them with a thin layer of moist cocopeat. Avoid planting them too deep, as excessive depth may hinder germination.

Mint seed

4. Since cocopeat is already moist, no additional water spray is needed at this point.

5. Place the pot in an area with sufficient light, either indoors or outdoors, avoiding direct sunlight or excessively dark rooms.

6. When the top layer appears dry, gently water the plant without applying excessive force.

7. Seeds will take at least 10-12 days to germinate.

8. Once germination occurs, move the pot to an area with 1-1.5 hours of sunlight after 1-1.5 months, avoiding intense sunlight.

Mint in pot

9. After 1-1.5 months, transfer the plant to a broad-shaped pot with the prepared soil mixture.

Broad pot for mint plant

Note:

  • Repotting is advisable in the evening to minimize stress on the plant. Thoroughly water the plant after repotting and use support sticks to prevent leaning.

Fertilizer for Mint plant

1. After approximately 2 months, provide additional nutrients to encourage growth.

cow dung liquid fertilizer

2. Feed the plant cow dung liquid fertilizer or vermicompost tea.

3. Before winter, nourish the plant with mustard cake liquid fertilizer for better winter resilience.

Sunlight requirement for Mint plant

1. Mature mint plants need 2-3 hours of sunlight, preferably gentle sunlight.

2. Place the plant under early morning or evening sunlight, shading it if exposed to intense afternoon sunlight.

Pruning of Mint plant

Pruning of Mint plant

Mint plants generally do not require pruning but consider it for:

  • Shaping the plant for a more organized appearance.
  • Trimming dull or damaged leaves, especially in winter or extreme summers.
  • Removing flowers to prevent seed formation and potential stress to the plant.

Also, read: Tips to Grow Tulsi from seeds 

Watering tips to Mint plant


Watering tips to Mint plant

1. Mint thrives in consistently moist soil, so water before the soil dries out.

2. Avoid overwatering to prevent plant deterioration.

3. Mint plants benefit from rainwater, so allow them to bask in the rain for enhanced growth.

This article provides a comprehensive guide on growing mint from seeds, covering all aspects to successfully cultivate mint at home.

Follow our Social media channel:

1. Voice of Plant – YouTube Channel

2. Voice of Plant Facebook Page

3. Instagram Voice of Plant Channel

Happy gardening!

revive tulsi plant

How to Revive a Dried Tulsi Plant

How to Revive a Dried Tulsi Plant


During the winter season, our Tulsi (Holy basil) plant enters a dormancy period, causing its leaves to wither and turn yellow. They do not receive adequate sunlight and warmth to grow well. Our Tulsi (basil) plant dries up causing concern about how to revive it.

How to Revive a Dried Tulsi (Holy Basil) Plant
Tulsi plant

What can be done to bring back its vibrant green color? Sometimes, in our efforts to help it grow, we unknowingly over-fertilize it, over-water it, and even prune it without understanding it, all of which can end up damaging our Tulsi (basil) plant.

Now that spring has arrived, it is time to care for your Tulsi plant to make it bushy and healthy. 

In this article, we will explore effective methods to ensure your Tulsi plant thrives during the spring season without the risk of overfertilization or improper care.

How to Revive a Dried Tulsi Plant


Understanding the Needs of Tulsi


tulsi plant
tulsi plant

Tulsi, or Holy Basil, requires specific conditions to flourish:

  • adequate watering,
  • sufficient sunlight, and
  • well-draining soil are essential for its growth.

Assessing the Plant’s Condition


When it comes to reviving a dried Tulsi plant, the first step is crucial – assessing its condition. Look closely for any signs of life.

Healthy Tulsi plants exhibit vibrant green stems and leaves, and you may notice new growth emerging from the soil.

  • However, if the stems appear dry and brittle, or the leaves are withered and brown, immediate intervention is necessary.

Methods to Revive a Dried Tulsi Plant


dry tulsi

1. Pruning Techniques

  • Regular pruning is crucial for shaping your Tulsi plant and encouraging new growth.

Tulsi plant primarily grows from its tips, so pruning or plucking from the tip stimulates the emergence of 2-3 new shoots, leading to the development of new branches and leaves.

tulsi pruning

If your plant is relatively new, around 6 or 3 months old, it’s best to stick to light pruning.

From February to October, regular light pruning can be performed to encourage new branch growth, but avoid harsh pruning.

  • After new stems emerge, wait until they reach a length of 5-6 inches before further pruning.
  • Hard pruning of Tulsi plant should be reserved for the month of February (during spring season).

For plants that are one or two years old, hard pruning can be quite beneficial.

  • By removing yellow leaves, dead, or leggy stems, you encourage the plant to grow more branches and denser foliage. This type of pruning helps maintain the plant’s shape and promotes healthier growth overall.
  • After hard pruning, add vermicompost into the soil.
  • Avoid using heavy fertilizers as the plants are currently leafless.

Important note:

  • Perform hard pruning of your plant only in the evening and keep it shaded for at least 7 days until new leaves emerge.
  • This will assist the plant in adapting to its new environment more effectively.

2. Change pot and add compost in the soil 

(i) For plants that are one or two years old, it is advisable to consider changing the pot if the roots are bound. Till the soil and add vermicompost to promote improved growth.

(ii) However, if your plant is relatively new, around 6 or 3 months old, there is no need to change the pot. Simply tilling the soil and adding vermicompost will suffice to promote healthy growth.

Important note:

  • Only repot your plant in the evening and keep it shaded for 3 to 4 days afterward as it may experience stress. This will help the plant adjust to its new environment more easily.

Must read:

How to grow & care Tulsi plant

Adjusting Watering Techniques

Maintain a proper balance between watering and drainage.

  • Overwatering can lead to root rot, while underwatering can cause stunted growth.
  • Make sure there is adequate drainage to avoid waterlogging, especially for plants grown in containers.

Sunlight for Tulsi plant

Tulsi plant

Sunlight plays a vital role in the growth and development of Tulsi plants.

  • To revive a dried specimen, it is crucial to provide adequate sunlight.
  • Choose a location that receives 5 – 6 hours of sunlight daily, preferably outdoors in a sunny spot.
  • Proper sunlight exposure helps stimulate photosynthesis and encourages healthy foliage.

Protecting from Cold Conditions


During colder months, protecting Tulsi plants from harsh weather conditions is imperative.

Exposure to frost or chilly temperatures can cause further stress to a struggling plant. Consider bringing potted Tulsi indoors or providing a protective covering, such as a frost cloth or greenhouse.

  • This shields the plant from the elements while allowing it to thrive in a controlled environment.

Monitoring for Pests and Diseases


Pests and diseases can wreak havoc on a weakened Tulsi plant, hindering its revival efforts.

  • Regular monitoring is key to identifying any signs of infestation or infection promptly.
  • Look out for common pests like aphids, spider mites, or fungal diseases such as powdery mildew.
  • If detected, take swift action using organic methods (neem oil solution spray) to mitigate damage and restore the plant’s health.

Best Fertilizers for Tulsi Plant


During summer, if fertilizers are used for other plants, you can use chemical-free options like “Cow-dung liquid fertilizer” or “Vermicompost” once a month.

  • Ensure cow dung is decomposed to prevent pest issues.

Must read:

How to grow Tulsi Plant from Seeds

Conclusion: Reviving Your Dried Tulsi Plant


In conclusion, reviving a dried Tulsi plant requires patience, diligence, and proper care.

  • By assessing the plant’s condition, trimming away dead parts, adjusting watering techniques, providing adequate sunlight, protecting from cold conditions, and monitoring for pests and diseases, you can breathe new life into your beloved herb.

Remember to be gentle yet thorough in your approach, allowing the plant time to recover and flourish once again.

Follow our Social media channel:

1. Voice of Plant – YouTube Channel

2. Voice of Plant Facebook Page

3. Instagram Voice of Plant Channel

Happy Gardening!

Make Your Own Garden!

10 Reasons Why You Should Have a Tulsi (Holy Basil) Plant At Home

Why You Should Have a Tulsi (Holy Basil) Plant At Home


Tulsi, also known as Holy Basil, Vrinda, and Vaishnavi, among other names, is a popular plant in many regions. It is a herb and holds immense significance in Hindu culture. It is revered for its medicinal properties and spiritual importance.

From spiritual significance to medicinal properties, Tulsi offers countless reasons to consider having it in your home. Let’s delve into the top 10 reasons why Tulsi should find a place in your home.

Why You Should Have a Tulsi (Holy Basil) Plant At Home.
Tulsi plant in a pot

 Why You Should Have a Tulsi (Holy Basil) Plant At Home


1. Auspicious Plant (Holy)


Tulsi is revered as a sacred plant in Hindu culture.

  • It is often worshipped and considered an embodiment of the goddess Lakshmi.


2. Lucky Plant and Gives Positive Vibes


  • The Tulsi plant brings peace, happiness, wellness, positive energy, and good luck to a home.


3. Medicinal Plant


Tulsi is a powerhouse of medicinal properties. Its leaves are rich in antioxidants, essential oils, and other bioactive compounds that offer a range of health benefits.

  • From boosting immunity to relieving respiratory ailments, Tulsi is a natural remedy for many health issues.


4. Perfect for Container Gardening

Tulsi plant soil

Tulsi is well-suited for container gardening, making it an ideal choice for urban dwellers with limited space.

  • You can easily grow Tulsi in pots or containers on your balcony, terrace adding a touch of greenery to your living space.

5. Easy to Care


One of the best things about Tulsi is its low-maintenance nature.

  • It requires minimal care and attention, making it suitable for both novice and experienced gardeners.
  • With regular watering and occasional pruning, Tulsi can thrive and flourish without much fuss.


Also Read: Watering Tips for Healthy Tulsi Plant


6. Perennial Plant

Tulsi is a perennial plant, meaning it can live for several years with proper care.

  • Its longevity ensures that you can enjoy its beauty and benefits for a long time, making it a worthwhile investment for your home garden.


7. Antibiotic and Pest Repellent Plant

tulsi leaves in bowl


Tulsi possesses natural antibiotic properties that help boost the immune system and fight off infections.

  • Additionally, its strong fragrance acts as a natural repellent against common garden pests like mosquitoes, flies, and ants, reducing the need for chemical pesticides.


8. You Can Grow from Seeds and Cuttings

tulsi seedlings


Whether you prefer starting from scratch with seeds or opting for the convenience of cuttings, Tulsi offers both options.

  • You can easily propagate Tulsi by planting seeds in well-draining soil or rooting cuttings in water, giving you flexibility in how you choose to grow this versatile plant.


Also, read: Grow Tulsi plant from seeds


9. Not a Very Heavy Feeder Plant, Does Not Need Much Fertilizer


Tulsi is not a demanding plant when it comes to nutrients.

  • A balanced fertilizer applied once or twice a year is sufficient to promote healthy growth, making it an economical choice for home gardening.

Also Read: How to Care Tulsi Plant


10. Can Be Kept in a Balcony of 3 to 4 Hours of Sunlight

Tulsi balcony


Tulsi is a sun-loving plant that thrives in full sunlight.

  • However, it can also tolerate partial shade, making it adaptable to various light conditions.
  • If you have a balcony or terrace that receives 3 to 4 hours of sunlight daily, it’s the perfect spot to place your Tulsi plant.


FAQs (Frequently Asked Questions) on Tulsi Plant


1. Can I Grow Tulsi plant in balcony?

Ans: Yes, Tulsi can be grown in balcony as long as it receives sufficient sunlight.


2. How Often Should I Water My Tulsi Plant?

Ans: Water Tulsi regularly, allowing the soil to dry out slightly between waterings.


3. Is Tulsi Easy to Care For?

Ans: Yes, Tulsi is relatively low-maintenance and can thrive with minimal attention.


4. Can I Use Tulsi Leaves for Cooking?

Ans: Absolutely! Tulsi leaves add a unique flavor to various dishes and beverages.

Follow our Social media channel:

1. Voice of Plant – YouTube Channel

2. Voice of Plant Facebook Page

3. Instagram Voice of Plant Channel

Happy Gardening!

flowers

Spring Gardening 10 Important Tasks

Spring Gardening 10 Important Tasks


The spring season plays a vital role in gardening, serving as a period of rejuvenation for plants that may have become weak or withered during the winter months.

It is a time for plants to recover from dormancy and prepare for the upcoming summer season. Additionally, spring marks the beginning of essential preparations for summer gardening. Basically, it is an important time in gardening for carrying out multiple tasks which are foundations for next year for the plants.

Spring Gardening 10 Important Tasks

Spring Gardening 10 Important Tasks


Important tasks to undertake in Spring season


1. Identifying the Correct Time for Pruning


One crucial aspect of spring gardening is determining the right time for hard pruning and root pruning, which is not always straightforward.

pruning of plants

While February is commonly associated with spring, it can vary depending on the yearly cycle and geographical location. To identify the optimal timing for these pruning tasks, gardeners should:

(i) Assess Plant Condition:

  • Look for signs such as the emergence of new leaves, buds, and shoots.

(ii) Observe Weather Patterns:

  • Note when temperatures begin to rise, signaling the transition to warmer weather and reduced need for heavy clothing.

These indicators signify the ideal time for hard pruning, as it’s generally avoided during the summer months. By following these guidelines, gardeners can ensure their plants receive the necessary care and preparation for the months ahead.

Must read:

What is Hard Pruning?

2. Winter Plants Inspection:


Inspect all winter plants to assess their condition.

  • Any plants that are thriving should be left undisturbed.
  •  While those that have withered or become damaged should be removed.

3. Soil Collection from Pots:


Gather any loose or leftover soil from the garden, ensuring it is cleaned thoroughly. Then, sift the soil through a sieve to remove any debris or impurities.

  • Finally, expose the soil to sunlight to ensure it is dry and ready for use in various gardening activities such as repotting plants or sowing seeds.

Must read:

How to Make Soil Mixture for Summer Plants

4. Summer Plants Monitoring:


Monitor each summer plant individually during the spring season and assess their condition. Treat each plant according to its specific needs:

  • some plants may be in excellent condition and require no treatment,
  • others may only need mild pruning, such as the removal of damaged leaves,
  • certain plants might benefit from repotting,
  • there could be instances where hard pruning is necessary,
  • some plants may require both root pruning and repotting.

Carefully assess each summer plant, addressing its specific needs accordingly.

5. Adding Compost after Tilling:


If your plant is thriving and does not require any treatment, start by removing any excess grass or weeds from the soil.

  • Then, make sure to till the soil thoroughly and mix in compost, such as vermicompost or kitchen compost, to boost nutrient levels and enhance soil health.

Adding compost is crucial regardless of whether you perform other tasks like hard pruning, root pruning, or repotting.

6. Seed Collection from Garden:


Collect seeds from different plants in the garden, including Night Jasmine (Harshringar), vegetables, and flowering plants such as Vinca, Clitoria (Aprajita), etc.

  • Wait until the seeds have fully dried and turned a toasted, brown color before gathering them. These dry seeds are ready to be sown for planting in the next season.

7. Sowing Time for Summer Plant Seeds/Bulbs:


Now is the perfect time to sow seeds and bulbs for summer plants.

seedling tray

  • While it is possible to sow them later, the resulting seedlings might struggle to stand properly, leading to bending and weakness, and even death.
  • Seeds of flowering, fruiting, and vegetable plants can be sown during this period.

8. Propagation through Roots and Cuttings:


Now is the perfect time to propagate plants from cuttings, as dividing plants into cuttings and planting them results in multiple new plants.

  • Species like aloe vera, snake plants, money plants, and many others can be propagated through cuttings.
  • Glass bottles are commonly used as containers for growing plants from cuttings, and various mediums such as sand, water, or clay balls are suitable for planting the cuttings.

Spring season offers an ideal opportunity to propagate plants through cuttings.

9. Garden Layout Design:


Designing your garden layout involves:

1. Sunlight & Space: Place sun-loving plants in sunny spots and shade-loving ones in shaded areas. Group plants with similar light needs together to optimize space.

2. Plant Selection: Choose plants that match your preferences, climate, and soil type. 

3. Compact & Climbers: Opt for compact plants in small spaces and use climbers to maximize vertical space. 

4. Seasonal Planning: Map out areas for both summer and winter plants, considering sunlight, temperature, and growth requirements.

By considering these factors, you can create a visually appealing and well-utilized garden space.

10. Initializing the process of composting


During winters, the composting process slows down, while in summers, compost can be generated at a faster pace. Therefore, it is advisable to commence the composting process during this season.

  • You can begin making various types of compost such as cow dung compost, kitchen waste compost, or dry leaves compost from the current season onwards.

Must read:

How to Make Kitchen Waste Compost

At last –


Gathering Garden Assets:


Ensure you have all necessary gardening supplies on hand by assessing your current inventory and acquiring any needed resources such as pruners, spray bottles, coco peat, sand, soil and other items.


Adhering to the dos and don’ts of the spring season can significantly enhance your gardening experience. By following these guidelines, you can effectively nurture and beautify your garden. 

Follow our Social media channel:

1. Voice of Plant – YouTube Channel

2. Voice of Plant Facebook Page

3. Instagram Voice of Plant Channel

Happy gardening!!

hibiscus flowering

How to Get Maximum Flowering in Hibiscus

How to Get Maximum Flowering in Hibiscus


Every flowering plant naturally tends to bloom, and if a hibiscus fails to do so for 2-3 months, it becomes a cause for concern. Typically, an underlying problem or issue is responsible for the lack of blooming. Therefore, the primary focus should be on identifying the problem before applying any treatment to the plant. Always refer to the checklist below to ensure all the plant’s requirements are being met.

How to Get Maximum Flowering in Hibiscus
Hibiscus flower plant

How to Get Maximum Flowering in Hibiscus


Sunlight requirement


Hibiscus, renowned for its large flowers, necessitates a minimum of 5-6 hours of direct sunlight to promote blooming on all pruned branches.

  • This plant requires a substantial amount of energy to bloom, and if it receives only 1-2 hours of sunlight exposure, successful blooming may be hindered.

Soil composition


Soil mixture

The primary requirement for the growth of any plant is suitable soil.

  • It is crucial that the soil is not clayey, and any signs of algae formation should be addressed by tilling it.
  • To enhance the soil’s nutritional content and promote a looser texture, incorporate vermicompost.
  • For strong root development, the soil should possess an effective drainage system and not be compacted.

Water requirement


Excessive watering in hibiscus can result in root rot and hinder flower blooming.

  • If overwatered, buds may form but will ultimately drop without blossoming.
  • Conversely, insufficient watering can lead to the plant’s demise, with no chance of blooming and eventual withering.

“It is crucial to provide a balanced water supply for hibiscus—water when the soil is dry and ensure watering until excess water drains out from the bottom of the pot.”

Pest attack in Hibiscus plant


Examine the plant for potential insect infestations, as hibiscus plants are susceptible to attacks from pests such as aphids, mealybugs, and other insects.

  • These dense plants may conceal pests, making early detection challenging.

Use of Neem Oil


Inspect for leaf miners and other pests, and be vigilant for potential soil issues such as fungal infections or diseases. Safeguard against these pest attacks by thoroughly spraying the entire plant with neem oil.

  • To address soil diseases, if present, create a mixture of neem oil and a small amount of cinnamon powder in water and administer it to the soil.

Pot Size for Hibiscus plant


While hibiscus typically thrives in a 10-12 inch pot, if, despite addressing the previously mentioned considerations, the plant fails to bloom, it is crucial to thoroughly inspect the pot for potential root binding.

  • Although hibiscus tends to appreciate being slightly root-bound, excessive binding can induce stress.
  • To assess this, carefully remove the plant from its pot, examine the roots, and if necessary, engage in root pruning.
  • Transplant the hibiscus into a larger pot to provide ample space, fostering optimal growth conditions. It will start flourishing again.


Soft pruning of Hibiscus plant


Generally, it is advised to conduct hard pruning on hibiscus in February, while soft pruning can be carried out year-round, excluding the harsh winter months.

If your hibiscus is not producing blooms, consider soft pruning and follow up with a diluted mustard cake liquid fertilizer to replenish soil nutrients to promote the development of new branches.

“It is important to refrain from giving the mustard cake liquid fertilizer during extremely hot summers.”

  • The diluted form of mustard cake liquid fertilizer is recommended due to its potency.
  • When pruning is performed, hormones are released at the pruned tips, stimulating the growth of fresh branches.

Lack of Nutrients


If, despite pruning, your hibiscus is not blooming as expected, it likely indicates a nutrient deficiency. To address this, apply Epsom salt to the entire plant.

Banana peel fertilizer:


After 10 days of the Epsom salt treatment, nourish the plant with a liquid fertilizer made from banana peel fertilizer. This particular fertilizer enhances the flowering process, and you will likely notice the emergence of new buds shortly after application.

Read article on:

How to make Banana peel fertilizer


Onion peel liquid fertilizer:

Following the banana peel fertilizer, wait for another 10 days and then give onion peel liquid fertilizer to the plant.

  • This fertilizer also promotes flower blooming, and you can expect to see new buds appearing within a few days.

Note:

  • In instances where the leaves of the blooming plant turn yellow, it is an indication of a need for more nutrients.

Cow dung liquid fertilizer


  • After 10 days of the onion peel fertilizer, provide the plant with a liquid fertilizer made from cow dung.

Read article on:

How to make Cow dung fertilizer

Note:

  • By adhering to this schedule of applying different liquid fertilizers every 10 days, you can stimulate consistent blooming in your hibiscus.

Increase the dosage of fertilizer after thoroughly inspecting all the concerns mentioned above. To cure the main problem is necessary to promote the blooming in plants rather than applying random theories of experiments.

As living entities, plants require a well-balanced diet consisting of sunlight, water, air, and essential nutrients. It is crucial to meticulously monitor and fulfill each of these requirements to ensure the effective growth and flourishing of the plant.

Once the plant is blooming at the anticipated rate, reduce the fertilizer dosage, as an excessive amount may adversely affect the plant. It is advisable to adhere to the hierarchical checklist mentioned earlier before administering any remedies to the plant.

Follow our Social media channel:

1. Voice of Plant – YouTube Channel

2. Voice of Plant Facebook Page

3. Instagram Voice of Plant Channel


Happy Gardening!!

leaf miner

What is Leaf Miner How to control and treat Leaf Miner

What is Leaf Miner How to control and treat Leaf Miner


Leaf miners, those tiny but troublesome pests, can wreak havoc in your garden if left unaddressed. In this comprehensive guide, we will delve into the world of leaf miners, exploring their life cycle, impact on plants, and effective strategies for prevention and removal. Let’s embark on a journey to safeguard your garden from these pesky intruders.


What is Leaf Miner How to control and treat Leaf Miner


Leaf miners are insects whose larvae feed on the internal tissues of plant leaves, creating distinctive patterns or mines. These pests encompass various species, each with its unique characteristics and preferences.

Read this article to learn about What is Leaf Miner? How to control and treat Leaf Miner. Check steps to prevent leaf miner.
leaf miner on tomato leaves

Understanding the significance of leaf miners is crucial for gardeners. The damage inflicted by these pests can compromise the overall health of plants, leading to economic consequences and diminished aesthetic appeal in gardens.

Identification of Leaf Miner Infestation


Signs and Symptoms


Detecting leaf miner infestations early is essential. Look for telltale signs such as discolored or distorted leaves, and the presence of winding trails or blotches on foliage.

Affected Plants


Leaf miners are not picky eaters. They target a wide range of plants, from vegetables and ornamentals to fruit-bearing trees. Identifying the affected plants is key to implementing effective control measures.

Life Cycle of Leaf Miner


Eggs and Larvae


Leaf miners undergo a fascinating life cycle, starting with eggs laid on the undersides of leaves. The hatching larvae then burrow into the leaf tissue, feeding as they grow.

Pupae Stage


As the larvae complete their feeding phase, they enter the pupae stage within the leaf. This transformation prepares them for adulthood.

Adult Stage


The emergence of adult leaf miners signifies the completion of their life cycle. Understanding this process aids in devising timely control strategies.

Impact on Plants


Damage to Foliage


Leaf miners compromise plant health by tunneling through leaves, disrupting the normal functioning of chlorophyll and hindering photosynthesis.

Reduction in Plant Health


Repeated infestations can lead to weakened plants, making them more susceptible to other diseases and environmental stressors.

Economic Consequences


In agricultural settings, leaf miner damage can have severe economic implications, affecting crop yields and quality.

Common Types of Leaf Miners


Blotch Miners

leaf miner Blotch Miners

Blotch miners create large, irregular mines on leaves, causing significant damage.

Serpentine Miners


Serpentine Miners

Serpentine miners leave distinctive, winding trails on leaves as they feed.

Needle Miners


Needle Miners

Needle miners target coniferous trees, causing needle discoloration and loss.

Prevention Strategies


Proper Plant Care


Maintaining optimal plant health through proper watering, fertilization, and pruning is a fundamental preventive measure.

Crop Rotation


Rotating crops helps disrupt the life cycle of leaf miners, reducing the likelihood of infestations.

Natural Predators


Encourage the presence of natural predators, such as parasitic wasps and predatory beetles, to keep leaf miner populations in check.

Click here to read: Leaf Miner in Tomato Plant: Treatment & Cure

What is Leaf Miner How to control and treat Leaf Miner


Organic Control Methods


Neem Oil


Neem oil acts as a natural insecticide, disrupting the feeding and reproductive processes of leaf miners.

Beneficial Insects


Introducing beneficial insects like ladybugs can help control leaf miner populations without resorting to chemical solutions.

Chemical Control Options


Insecticides


Selecting and applying insecticides with precision is crucial for effective leaf miner control.

Systemic Treatments


Systemic treatments, such as soil-applied insecticides, provide long-lasting protection against leaf miners.

Timing of Application


Applying control measures at the right stage of the leaf miner life cycle maximizes their effectiveness.

Cultural Practices for Leaf Miner Management


Regular Pruning


Pruning affected leaves helps remove larvae and minimizes the spread of infestations.

Removing Infested Leaves


Promptly removing infested leaves prevents the further development and spread of leaf miners.

Maintaining Soil Health


Healthy soil contributes to strong plant growth, making them more resilient to leaf miner attacks.

DIY Remedies


Homemade Insecticidal Soap

A simple mixture of soap and water can be an effective and eco-friendly solution for controlling leaf miners.

Garlic Spray

Garlic’s natural insect-repelling properties make it a valuable ingredient in homemade sprays.

Sticky Traps

Placing sticky traps around affected plants captures adult leaf miners, disrupting their reproductive cycle.

Importance of Early Detection


Monitoring Techniques


Regularly inspecting leaves and using sticky traps helps detect leaf miners in their early stages.

Regular Inspection


Routine checks on your garden ensure timely identification and intervention, preventing severe infestations.

Follow our Social media channel:

1. Voice of Plant – YouTube Channel

2. Voice of Plant Facebook Page

3. Instagram Voice of Plant Channel

Happy Gardening!

groundnut fertilizer

Groundnut Fertilizer: Strongest Fertilizer for Plants

Groundnut Fertilizer for Plants

What is Groundnut Organic Fertilizer?


Groundnut cake is an organic fertilizer derived from the byproduct of the groundnut oil extraction process. During the extraction of cooking oil from groundnuts using machines, the residual cake is obtained. This cake, free from any chemicals, serves as an excellent organic fertilizer, enriched with nutrients beneficial for plant growth.

groundnut fertilizer

The composition of groundnut cake includes essential elements such as nitrogen (N), phosphorus (P), and potassium (K), commonly referred to as NPK, along with fibers and proteins. It is important to note that groundnut cake lacks certain micronutrients.

Nutritional value of Groundnut Cake:

  • Nitrogen: 7.3
  • Phosphorous: 3
  • Potassium: 2.2

By incorporating groundnut cake into soil, gardeners and farmers can provide plants with a natural and organic source of nutrients, promoting healthy and robust growth.

Benefits of Groundnut Fertilizer


groundnut cake fertilizer
groundnut cake

When applied at the appropriate time, groundnut cake significantly enhances overall plant growth, stimulating the development of new leaves and branches. This organic fertilizer, enriched with nitrogen, effectively addresses the problem of yellowing leaves in plants, providing a valuable solution when leaf discoloration occurs. Furthermore, groundnut cake expedites the process of photosynthesis in plants, contributing to a more vibrant and lush garden.

In essence, it is a potent fertilizer with essential NPK components that visibly improves the overall health and growth of plants.

Groundnut Fertilizer: Strongest Fertilizer for Plants


1. Where to obtain Groundnut Fertilizer

Groundnut cake can be easily obtained from nearby factories where the extraction of ground oil takes place.

  • Additionally, it is readily available online, with approximately Rs 300 per kilogram.

2. Process of Applying Groundnut Cake to Plants:

Groundnut cake can be incorporated into plant care through three methods:

1. Soil Mixture Addition:

    • Grind the obtained groundnut cake pieces into a fine powder using a mortar.
  • groundnut cake fertilizer in soil
    adding groundnut cake fertilizer in soi-mix
    • Mix this powder into a prepared soil mixture, adding a handful of the fertilizer powder to approximately 5 kg of the soil blend.

2. Adding in Pot Soil:

    • When preparing soil mixtures repeatedly is not feasible due to time constraints, directly add groundnut cake powder to the pot soil.
  • adding in pot soil - groundnut cake fertilizer
    adding in pot soil – groundnut cake fertilizer
    • For a 12-inch pot used for a plant, incorporate 2 tablespoons of groundnut cake powder.
    • Ensure that you loosen the soil before adding the powder, then water the plant after application.

3. Making Liquid Fertilizer:

    • Dilute approximately 100 grams of groundnut cake in 4-4.5 liters of water to create a liquid tonic. This quantity is suitable for approximately 300 plants.
    • Be vigilant for any insects in the cake that may emerge after dilution, and remove them.
    • Keep the solution covered in an area with no direct sunlight exposure.
    • Allow it to ferment for at least 2 days for the cake to dissolve properly in water. This process is best practiced during winter.
    • If left for more than 4 days, it may attract insects and fungus, so it’s advisable to keep it for 2-3 days only.
    • Dilute this tonic with a significant amount of water; for example, add 2 mugs of this solution to 40 liters of water.
    • The final solution’s consistency should be very thin, not resembling a thick paste, as it is enriched with a large quantity of nitrogen and has a warm nature that could potentially harm the plant.
groundnut cake liquid fertilizer

Note:

  • For a small garden with around 20 plants, take 2 small pieces of groundnut cake, dissolve them in 1 liter of water, and allow the mixture to dissolve for 2 days.
  • After 2-3 days, dilute it with 8-10 times the amount of water before applying it to the plants.

The efficiency of the liquid tonic in boosting the growth of plants is much higher compared to the first two methods.

Precautions to take while using Groundnut Cake Fertilizer:

1. Temperature Considerations:

    • Avoid using this fertilizer in hot weather with temperatures above 30-32°C, as it can warm the soil and potentially harm the roots, causing them to burn.

2. Plant Compatibility:

    • While suitable for all types of plants, including outdoor, indoor, flowering, or fruiting plants, refrain from using it on decorative succulents.

3. Timing of Application:

    • In cold weather, apply the fertilizer at any time of the day. As temperatures rise, especially in March, administer the fertilizer during the coolest parts of the day, such as early morning or evening after sunset.

4. Soil Moisture:

    • Ensure that the soil is neither too dry nor too wet before application.
    • If the soil is dry, moisten it with water before adding the fertilizer. If the soil is too wet, adding fertilizer may lead to fungus growth and root rot. Maintain consistently moist soil.

5. Application Method:

    • Feed the plant with the well-diluted solution until it starts draining out from the bottom hole of the pot.
    • The diluted solution should not have adverse effects on the plant at this point.

6. Application Cycle for Different Plants:

    • For leafy outdoor plants (e.g., tulsi, curry patta, and coriander), administer the fertilizer once a month.
    • Avoid using other potent fertilizers during the application month.
    • For heavy feeder plants (e.g., hibiscus and lemon), apply the fertilizer every 20 days.
    • Avoid using the fertilizer during flowering and fruiting stages.

7. Specific Application Situations:

    • Apply the fertilizer when the plant becomes nutrient-deficient, showing yellowing leaves after growing numerous branches and flowers.
    • After hard pruning, wait for 15 days before applying the liquid fertilizer to stimulate new branch growth and enhance overall plant health.

8. Seedlings and Micronutrients:

    • Never feed this fertilizer to seedlings.
    • If necessary, provide micronutrients instead.

9. Compatibility and Neem Oil:

    • Do not mix this fertilizer with any other and avoid applying additional fertilizers for at least 15 days after use.
    • Neem oil can be sprayed while using this fertilizer.

10. Application Method:

  • Never use this fertilizer as a foliar spray; always apply it through the soil.
  • Prepare the required quantity as it cannot be stored due to the risk of attracting fungus and insects.

Limitations of Groundnut Cake Fertilizer:

1. Seasonal Application:

Groundnut cake fertilizer is season-oriented and should not be used in summer.

It is best applied to plants during the period from October to March. Therefore, an alternative fertilizer may be required for the rest of the growing season.

2. Micronutrient Deficiency:

    • Lacks Micronutrients: This fertilizer lacks micronutrients.
    • To meet the required nutrient levels for heavy feeder plants, additional micronutrients should be applied after 15 days of using groundnut cake fertilizer.

In conclusion, while groundnut cake fertilizer has its limitations, it remains an essential addition to your gardening supplies. It significantly enhances the growth of heavy feeder plants to remarkable levels when used appropriately.

Also read:

Mustard Cake Fertilizer Benefits and Uses


Follow our Social media channel:

1. Voice of Plant – YouTube Channel

2. Voice of Plant Facebook Page

3. Instagram Voice of Plant Channel

Happy Gardening!!

winter flowers

How to Care Plants in Winter Season: 8 Tips

How to Care Plants in Winter Season


Taking care of plants during the winter season is crucial for their well-being. Just as humans adapt to changes in weather, plants also need adjustments to their care routine to thrive during the colder months. This is especially true for summer plants, which require special attention and nurturing in winter to prevent deterioration.

How to Care Plants in Winter Season

Achieving remarkable results is possible with minor tweaks in plant care. By making subtle adjustments in response to current weather conditions, you can ensure the sustainability of your plants. Let’s explore the winter care journey of plants through the following 8 tips.

  1. Watering tips
  2. Protect plants from cold
  3. Accept changes in plants
  4. Avoid pruning and repoting of plants
  5. Do not Disturb Summer Plants in Winters
  6. Protect plants from pest attack
  7. How and When to Give Fertilizer
  8. Old plants are strong plants

How to Care Plants in Winter Season


1. Watering tips


In winter, plants require less water compared to summer, but it is crucial not to neglect their hydration needs.

Unlike in summer, when we typically water when the topsoil is dry, in winter, wait until the soil is dry down to the roots before watering. Allow the top layer to dry for 4-5 days before providing water.

watering plants

When watering in winter, avoid using extremely cold water as it can harm the plants.

  • Opt for lukewarm water for a more plant-friendly approach. Thoroughly assess the soil’s moisture content; refrain from watering if it still retains moisture, and water adequately if the soil is completely dry, allowing water to drain from the pot’s bottom hole.
  • Maintain plant cleanliness by using lukewarm water for spraying when necessary, applying the spray to leaves and flowers to keep them clean and healthy.
Click here to read: How to water plants?….

2. Protect plants from cold


It is crucial to protect plants from harsh, cold waves to prevent their demise. As winter approaches, typically around October to November, consider:

plants under green shade

  • Relocating summer plants indoors.
  • Placing them under protective shade.
  • Additionally, cover them with a protective sheet for added insulation.

4. Accepting visible changes in plants during winters


In winter, summer plants inevitably experience stress, leading to visible changes that should be acknowledged and accepted to a certain extent. These changes may include:

hibiscus yellow leaves
  • Reduction in the size of leaves.
  • Survival mode with minimal or no growth.
  • Development of leggy stems.
  • Yellowing or browning of leaves.

Admit that these changes are temporary, and plants generally recover when the weather aligns with their specific requirements.

  • Embrace positive changes, such as the blossoming of flowers and the growth of winter vegetables like carrots and radishes.
  • Cherish these transformations with a positive outlook and appreciation for the natural cycles.

5. Do not Disturb Summer Plants in Winters


During winter, when summer plants experience stress, it is advisable to refrain from intensifying their disturbance by avoiding certain practices stated below.

pruning

  • Avoid normal pruning,
  • Avoid hard pruning,
  • Root pruning should also be neglected,
  • Repotting is not favourable at this time,
  • Pinching is also not recommendable,
  • No experiment should be performed with the plant at this time.

When the plant is healthy and in its growing stage at that time all the experiments and treatment can be performed with the plant but not when it is already under stress.

(i) Avoid using pruners and scissors on summer plants: Dry leaves and mature flowers of plants like tulsi which can be removed from hands, can be removed but avoid using pruners and scissors on summer plants.

pruning of Manjaris
Remove mature flowers of Tulsi plant

(ii) Avoid Har Pruning of winter plants: Pruning and repotting of winter plants can be done during winters on the day when the temperature is little warm and favourable but hard pruning of winter plants should not be practiced at this time.

Click here to read: How to do Pruning of Plants…

6. Protection From Pest Attack


While the likelihood of pest attacks during winter is minimal, remain vigilant, as plants are already under stress. 

Mealybugs on plant leaves

  • If any signs of pest infestation are detected, particularly mealybugs or aphids, take immediate action.
  • Initiate a neem oil treatment by thoroughly cleaning the affected plant with water and then spraying it with a neem oil solution.
  • This prompt response is essential to prevent pests from increasing the plant’s stress, ensuring its survival during the winter months.

7. Fertilizer Requirements


Summer plants exhibit minimal to zero growth during winter, being under stress.

Refrain from applying heavy feeder fertilizers during the winter season.

Exceptions can be made for mustard cake and groundnut cake fertilizers.

How and when to give mustard cake and groundnut cake fertilizers

(i) Thorough dilution with warm water : When using these fertilizers, ensure thorough dilution with warm water before application.

mustard cake liquid fertilizer

(ii) Give at intervals of approximately 50-60 days: Feed the plant with these fertilizers at intervals of approximately 50-60 days during the winter.

Note:

  • Mustard cake and groundnut cake fertilizers possess warming properties, regulating soil temperature and assisting the plant in maintaining warmth.
  • It is important to note that these fertilizers do not stimulate plant growth during the winter months.
Click to read: How to make Mustard Cake Liquid Fertilizers..


8. Mature Plants are Strong Plants


Mature plants that have been nourished over the years experience less stress and endure winter conditions well. Conversely, newly acquired or recently planted plants, especially those introduced 4-5 months ago, are more susceptible to stress.

Robust plants exhibit a faster recovery pace compared to newly established ones. However, with time, these plants will gradually recover.

It is important to note that as the next season arrives, all summer plants have the inherent ability to recover on their own. There is no need to worry about winter gardening; instead, embrace and appreciate the unique aspects of the season.


Follow our Social media channel:

1. Voice of Plant – YouTube Channel

2. Voice of Plant Facebook Page

3. Instagram Voice of Plant Channel

Happy gardening!


Happy Gardening !